Sunday, August 30, 2015

Tips for sewing hexies by hand

Whenever I go away on vacation, I ALWAYS take along a hand sewing project. There is always down time while we are on vacation, and it is so nice to have something to work on while we are watching TV at night or driving in the car. The added bonus is that when the project is finished it will remind you of your time on vacation!

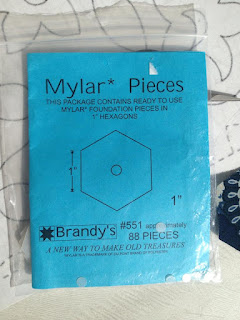
When I headed to Florida this past March I decided to take along 1 inch hexagons to hand stitch together. I had seen my friend Donna Taylor from Taylor Sewing Centre demonstrate how to use thes Mylar pieces from Brandy's and couldn't wait to try them out!! As luck had it, my Accuquilt hexagon die cut pieces that were PERFECT for using the templates. I used a stack of fat quarters that I bought from Kallisti Quilts  and cut a whack of hexagons to take along.


The hexagons are very easy to use. All you do is pin each Mylar template to the back of each fabric hexagon through the hole in the middle. You then fold over the edges and tack them down at each corner with a couple sticthes. 


Once all of the corners are tacked down, you can knot off your thread and stitch the next hexagon. To stitch the hexagons together, you just whip stitch the two edges together from the back.


You can sew the hexagons together into rows and them stitch the rows together using the same whip stitching method. 


Months later I'm still working on this project. I took it to Blue Mountain with us this week and managed to add a few more rows. I think it will be a tablerunner when I am done, but who knows, I may just keep on sewing until it's a lap quilt!!



Wednesday, August 26, 2015

Fast and easy quilt for a "Modern" kinda guy


If you need a fast and easy quilt to make for a special guy in your life, Our Mosaic Maze pattern might just fit the bill! The large blocks feature easy piecing and go together SUPER fast. Nellie and I designed the quilt using digital images of the fabrics in EQ6, So it was fun to make the actual quilt when I went to the quilt retreat last year. 

Usually I precut everything for my projects, so when I am at the retreat I can just sit and sew,sew,sew. But, this time I ran out of time and had to cut the pieces there.


 Even doing that, I managed to put the quilt top together in one afternoon!!

 
I decided to add an additional pieced border using the fabric that was left over after cutting the pieces for the blocks. To set off this pieced border I also added a second black inner border.


When I got home from the retreat it was time to put it on the quilting frame.
I had so much fun quilting this quilt as I got to do a fun overlapping square and rectangle design using the vertical and horizontal locks on my Gammill.


 A black binding finished it off and it was all ready for Christmas! It now lives at my brother's house BUT, once in awhile it gets to hang out with the rest of my quilts!!


My booth at the Thousand Islands Quilt Guild quilt show - May 2015


Monday, August 24, 2015

Great ways to get your kids to eat more veggies

My kids are just like the rest of them. They would prefer to eat only chips, cookies, granola bars and anything else that is FASt and EASY!!  But, like most moms, I want them to eat more healthy foods. With our busy lives this can be harder than I ever imagined!

When I started using Thrive products, I was pleasantly surprised that my kids were actually snacking right out of the cans of freeze dried foods! Carson was in love with the blueberry yogurt bites and Aidan would actually sit in the pantry and eat peas and peppers right out of the can.

I was having trouble keeping their favourites ones in the house and sometimes would realize too late that we were out of mixed bell peppers!!!

For really picky eaters you can take the veggies and crush them into a powder to "sneak" them into foods that your kids already like. It's tricky, I know, but sometimes a mom's gotta do what a mom's gotta do!

Now, Thrive has come out with "Snackies", the new product just launched at the convention last month. My first box arrived this week and I think I'm in LOVE. The coconut bites are to DIE FOR!!


And the carrot crisps, spinach crisps and beet crisps will be AWESOME additions to school lunches in the fall (yes, just 2 weeks to go moms).
The great thing about these new Snackies (besides the taste) is that they are made from REAL FRUITS AND VEGGIES. No preservatives, no artificial colours or flavours. 


Doesn't that sound better than the alternatives that we all seem to have in our cupboards?


Saturday, August 22, 2015

A great way to make easy Blueberry, Cranberry, Lemon Scones


Yesterday my youngest son requested scones for breakfast. Usually on a Friday morning this type of request wouldn't be granted, BUT since I was still on holidays and since he was suffering from a sinus infection, I got out my favourite recipe and got to work.

I haven't made scones since I started using Thrive, so I decided to "Thrivelize" my recipe!! I got out my Thrive blueberries, Thrive cranberries (about 1/4 cup of each) and Thrive Lemonade powder (1/2 tsp) and mixed them with a little water (3 tsp). I let them sit and got to work on the scones.


Here is my super easy scone recipe:

2 1/4 cups   all-purpose flour
2 tbsp         white sugar
2 1/2 tsp     baking powder
1/2 tsp        baking soda
1/2 tsp        salt
1/2 cup       cold butter cubed
1 cup          milk
2 tsp           lemon juice


  1. Mix the lemon juice and milk and set aside.
  2. Add the five dry ingredients to a food processor and pulse. Add the butter and pulse until the mixture resembles course crumbs.
  3. Pour this mixture into a bowl and add the milk - stir with a fork.
  4. At this time you can add whatever additions you want.


         *** My son loves chocolate chips in his scones, so I take out enough batter to make three scones and add the chocolate chips to it. For the rest of the scones I mixed in my Thrive berry mixture,

      5.  Drop by large spoonfuls onto parchment paper.
      6.  I sprinkled Thrive honey Crystals on top, but you could use sugar instead.
      7.  Bake at 425 F (220 C) for 12-15 minutes (until puffed and golden)

Makes about 12 scones (or 9 if you are the Baker family LOL)


Using the food processor makes the job quick and easy. And using Thrive is a great way to make easy Blueberry, Cranberry, Lemon Scones that are super yummy!!


Thursday, August 20, 2015

8 Great ways to use Oh Canada Fabric

Celebrate Canada - our newest book - is FINALLY available!!


In this book Nellie and I show you 8 great ways to use Oh Canada fabric from Northcott. These fabrics are a favourite for most Canadian quilters and we had a blast using them to design three quilts, a wallhanging, a tablerunner, placemats, an apron and a tote bag!!


The book is now available at quilt shops, on our website and on Craftsy! All of these projects would also look great made with fabrics from your stash!!!

Sunday, August 16, 2015

Mountain View pattern

Nellie and I have been VERY busy this summer!! Our latest pattern for Northcott, Mountain View, has just been added to our Craftsy Pattern Store!!
This pattern uses Northcott's Stonehenge Aspen Ridge panel and co-ordinating fabric so it is super easy and quick to sew together!!


 Here it is - the finished project!! Look for this pattern and fabrics at your local quilt shop and check out all of our downloadable patterns on our Craftsy site.


Saturday, August 15, 2015

Why Thrive???

I guess you could say I have my hands full with everything going on in my life. Between working as a pharmacist, having two teenage boys, family health issues which have us going out of town for medical appointments almost every week and my quilting businesses, I pretty much fill my days. People are always asking me how I do it all (the answer is being organized) and why I take on more projects (the answer to that is a bit more complicated I think LOL - perhaps I just want to try EVERYTHING).

My newest venture is Thrive foods and I really happened upon it by accident. While I was in Florida visiting my parents in March, my mom's friend asked me if I had ever heard of Thrive. She said it was new and it was freeze dried food. My first reaction was "yuck" that sounds disgusting. But, she told me to look it up online so I did and the more I looked at it and the more I thought about it the more interested I became!

 Thrive is really a revolution in food! And for someone who is as busy as I am, I needed some help ensuring that my family had nutritious, delicious and EASY food!!!  For almost a year now we have been using and loving Isagenix, but I wanted to be able to make healthy meals for my family too. For years I have been buying fruits and vegetables on a weekly basis and watching them go bad before we could eat them!!


Besides the convenience and the reduction in waste, Thrive foods are packed with nutrients!!


We have been loving our Thrive foods and we are having so much fun sharing them with our friends and family! Check out the Thrive Life Website to see all of the products available - believe me you will be AMAZED!!!

Monday, August 3, 2015

Quilting the birthday quilt

Finally...

Just like the cobblers children who never had shoes, sometimes my kids have to wait a long time to get a quilt. Carson has been waiting for his birthday quilt to be quilted for over 4 months now!! There always seams to be another customer quilt that needs to be done first. But today was the day!! I FINALLY assembled the backing, loaded it on my Gammill and got to work!
The birthday quilt loaded onto the Gammill

I made this quilt top by appliquéing large hexagon shapes onto a single piece of fabric using fusible web. The hexagons were cut using my Bullseye Hexagon Die set from Accuquilt. I used the blanket stitch on my sewing machine to stitch down all of the edges. I especially liked the look of the edges that were stitched with the black and white variegated thread - it almost looked like piano keys when it was finished.

After the quilt was loaded on the machine, I selected a variegated grey thread and decided to do a meandering design over the whole quilt, but once I got to the first hexagon, I decided to try out a different design.


As I made my way across the quilt, I tried out more and more designs in each of the hexagons. This quilt was so much fun to quilt as I knew my son would love it even if I made a "mistake". 


Here is the quilt all quilted - now how long is it going to take for me to put binding on it??? Maybe he'll get it by Christmas LOL.